|
Article ID: 4424
Last updated: 20 May, 2014
The pan system sends out emails automatically upon certain event occurrences. Some common automatic emails are:
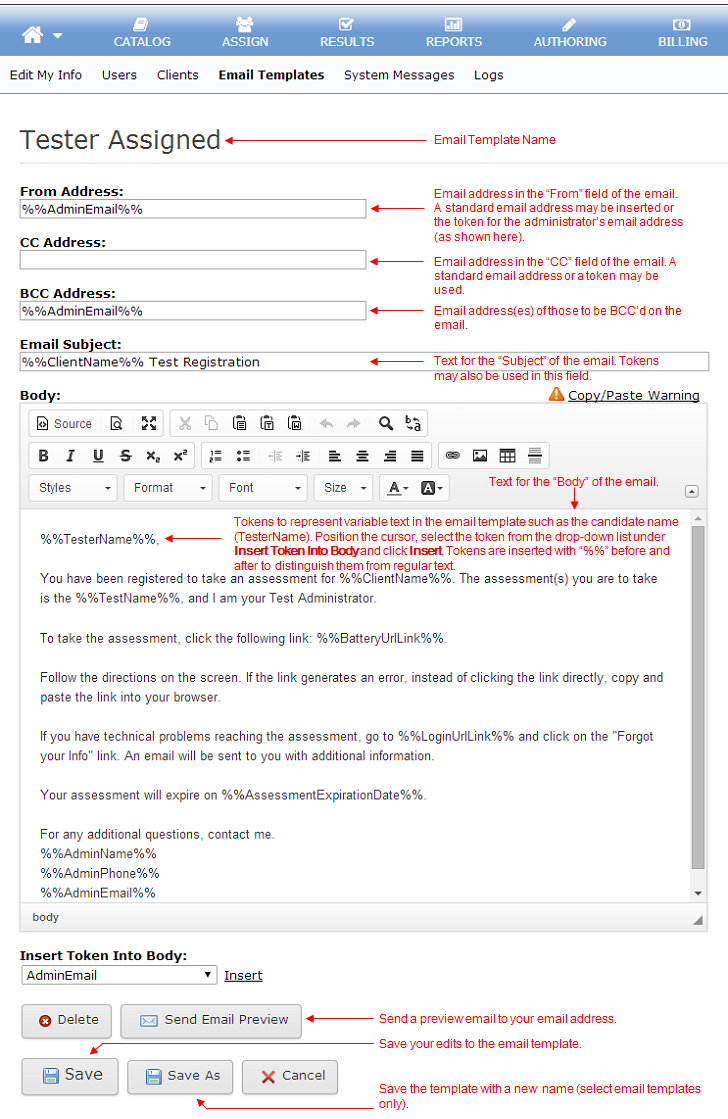
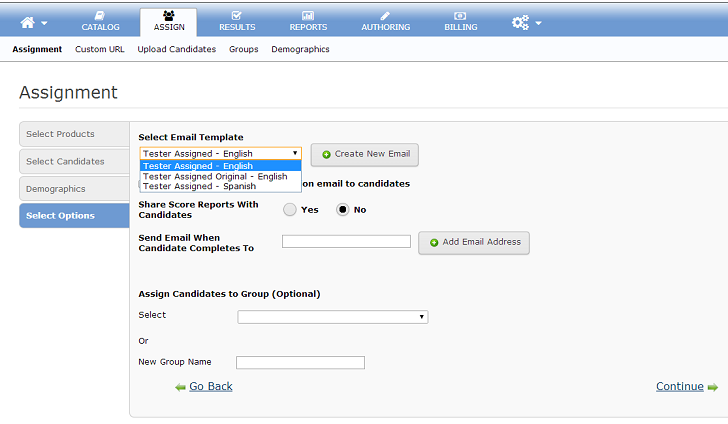
Each of the automatic emails has a corresponding template that is used when sending out the email. When the system sends out the email, the pertinent items of information, such as candidate name, assigned assessment and assessment link, are inserted in designated places in the email (see the Tester Assigned example under Viewing and Editing Email Templates below). For a list of some of the commonly used email templates, see the Email Templates Reference.
Viewing and Editing Email TemplatesTo view the templates or make modifications:
Inserting TokensTokens can be inserted into the From, CC, or BCC Email Address fields, Email Subject, or Body of the email template. Tokens represent variable text in the email, such as the candidate name (TesterName) or the link to the assessment (BatteryUrlLink). To insert a token into the From Address or Email Subject, place your cursor where you wish to insert the token and type in the token reference. Please see the Notes for Typing in Tokens below. To insert a token into the Body of the email template:
Notes for Typing in Tokens: You may type in tokens, but if you do so:
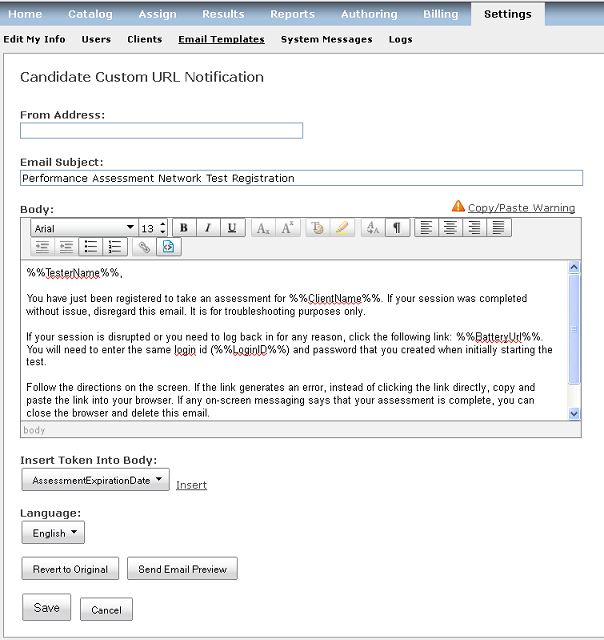
See also the Tokens Reference topic for an explanation of the available tokens. Editing the From, CC, or BCC Email Address FieldsWhatever you insert in the “From Address” field in the email template will be inserted into the “From” field of the email. A standard email address may be inserted or a token may be used, such as the %%AdminEmail%% token to insert the administrator’s email address (see "Inserting Tokens" above). For example, if you use the %%AdminEmail%% token in the From Address in the Tester Assigned email template, the email sent to the candidate will be “from” the test administrator’s email address. Editing the Email Subject of the Email TemplateThe text in the “Email Subject” field in the email template will appear as the subject line of the email. Tokens may be used in the Email Subject (see "Inserting Tokens" above), for example, the following Email Subject: %%ClientName%% Test Registration Information
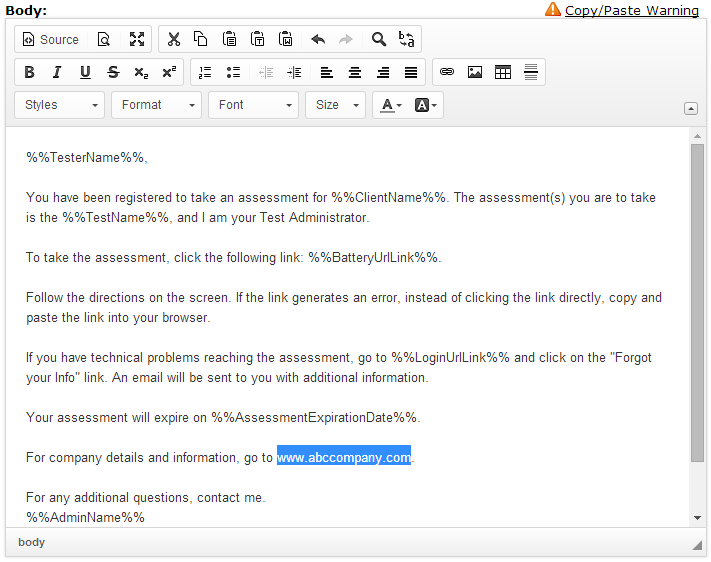
ABC Company Test Registration Information Editing the Body of the Email TemplateIt is recommended that you edit text directly in the editor textbox. If you use copy/paste to insert text, just make sure to test the email prior to sending to candidates. The edit bar at the top of the body text editing box contains formatting tools that you can use to format the text of the email. As you are editing text the following options are available:
Mouse-over each button to see its function. See the following additional topics related to editing the body of the email template: The Link button (
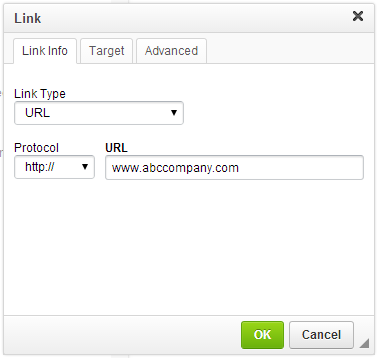
If you wish to view or edit your email template text as HTML or if you wish to double-check that a link has been inserted correctly, click the Source button (
The HTML code of the link inserted in the example above would be: <a href="http://www.abccompany.com">www.abccompany.com</a> To return to normal editing mode, click the Source button again. You may want to insert a link into the email template for the following tokens:
To take the assessment, click the following link: %%BatteryUrlLink%% Will insert something similar to the following into the body of the email when it is sent (with the assessment link inserted as a clickable link): To take the assessment, click the following link: https://tara.vitapowered.com/TestEngine/TestLauncher.aspx?batteryID=efc7d884-55af-4a26-ba7f-c01c0adb7863&key=VwiemkiQOITL1Usm6oNXEANe2spz8wUOXqF21lahHIE1. Inserting the %%BatteryUrl%% token or the %%LoginURL%% token inserts the URL, but not as a link.
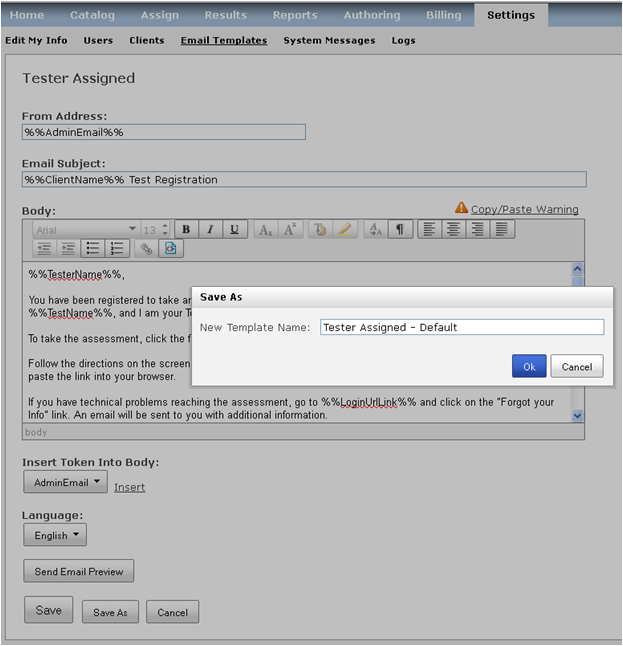
Using the Save As Function (Tester Assigned Email Template Only)Within Settings | Email Templates, the Tester Assigned Email Template has a Save As button that can be used to save multiple custom versions of the "Tester Assigned" email template. If you wish to retain the original default Tester Assigned email template for use in sending notices to candidates or simply for future reference, you must use the following procedure to avoid overwriting the original: Note: You can always return to the original template by using the Delete function. The procedure below is for the situation where you wish to have the original available along with your custom templates.
|


| Token Name: | Variable text inserted in place of this token: |
| AdminEmail | Email address of the test administrator |
| AdminID | Login ID of the test administrator |
| AdminName | Name of the test administrator |
| AdminPhone | Phone number of the test administrator |
| AssessmentExpirationDate | Expiration date of the assessment. This is based on the setting in the Client record, Assessment Expiration (In Days). |
| BatteryInstanceResultsLink | URL that allows access to the completed results for external recipients. The option to send results to external recipients is available if the Send Results to Other Recipients setting in the Client Information record is set to Yes. When this setting is set to Yes, the Admin will see the Send Email When Candidate Completes To option during the assign process. Upon test completion, an email will be sent to external recipient emails specified during the assessment assignment process. |
| BatteryUrl | URL of the assessment that has been assigned to a candidate |
| BatteryUrlLink | URL as a link of the assessment that has been assigned to a candidate |
| ClientName | The name on your client account (typically your company name) |
| ClientInventoryURLEmails | The email address of the test administrator who will receive the inventory notice emails for a Custom URL. |
| ClientInventoryURLIdentifier | Custom URL |
| ClientInventoryURLMaxCandidates | The Maximum Number of Candidates specified in the Custom URL definition. |
| LoginID | Login ID of the candidate or user receiving the email |
| LoginURL | The URL that you access to login to your account |
| LoginUrlLink | The URL (as a link) that you access to login to your account. |
| Password | Password of the candidate or user receiving the email |
| TesterEmail | Email address of the candidate assigned an assessment |
| TesterName | Name of the candidate assigned an assessment |
| TestName | Name of the test (assessment) the candidate has been assigned to complete |
| TesterAssignedEmailReminderDays | Number of days specified in the client record on the Email Reminder (In Days) setting. |
| ToAddresses | Email addresses of external recipients receiving test completed emails (using the Test Completed for External Emails email template). The "ToAddresses" would be the email addresses entered in the Send Email When Candidate Completes To: area of the Step 3 - Assign tab during the assign process. To see this option the Send Results to Other Recipients setting in the Client Information record must be set to Yes. When this setting is set to Yes, the Admin will see the Send Email When Candidate Completes To: option during the assign process. Upon test completion, an email will be sent to external recipient emails specified on the Step 3 - Assign tab. |
Notes:
- The above tokens should always be entered in the email template with "%%" before and after the token name, for example, %%TestName%%.
- Not all tokens are available in every email template. When editing the email template, rely on the Insert Token Into Body drop-down menu for the list of tokens that are valid for the current email template.
Email Templates Reference
Selected email templates:
| Candidate Created | Sent when candidate is created if the option, Send New Candidate Email within the Client record is set to Yes. |
| Candidate Custom URL Notification | Sent to a candidate when they register for an assessment via a Custom URL. Contains a link to the assessment so that the candidate can access the assessment at a later time if their test session is interrupted and they are unable to complete the test in one session. Also provides the candidate with a reminder of the login id they provided when they registered for the assessment. |
| Candidate Score Reports Available | Notification to the candidate that their score reports are available for review. Used in cases where candidates are to review their own results (such as for personality or career development assessments). Provides the candidate with the login URL so they can easily access their account. The Allow Candidates to View Score Reports option in the Client record must be set to Yes. |
| Test Completed | Notification to the test administrator that a candidate has completed an assessment and the results are available for review. |
| Test Completed for External Emails | Notification to external recipients that a candidate has completed an assessment. The email also contains a link so that the external recipient can review the assessment results. The option to send results to external recipients is available if the Send Results to Other Recipients setting in the Client Information record is set to Yes. When this setting is set to Yes, the Admin will see the Send Email When Candidate Completes To: option during the assign process. Upon test completion, an email will be sent to external recipient emails specified on the Step 3 - Assign tab. |
| Tester Assigned | Notification to a candidate that they have been registered to complete an assessment. Provides the candidate with the client name (name of the company who registered them for the assessment), the name of the assessment they are to complete, and a link to the assessment. The candidate can click the link to take the assessment and may use it to access the assessment later if they are unable to complete the assessment in one session. This email is sent to the candidate (as well as a copy to the Test Administrator) is sent if the Send Tester Assigned Email setting within the Client settings is set to Yes. |
| Tester Assigned Reminder | Sent to the candidate if they have not started an assessment they are registered for within a specific number of days, specified by the Email Reminder (In Days) setting under Client settings. This email is sent if the Send Tester Reminder Email setting within the Client settings is set to Yes. |
| URL Max Reached | Sent to the test administrator when the maximum is reached for a Custom URL. This email is sent if the Maximum Number of Candidates is specified for a Custom URL AND the Notify When Maximum Reached option within the Custom URL definition is set to Yes. The email will be sent when someone attempts to access the URL AFTER the maximum has been reached. See Creating Custom URLs for more details. |
| URL No Qty | Sent to the test administrator when all available inventory has been consumed when using a Custom URL. This email is sent if the Notify When All Purchased Quantity Administered option within the Custom URL definition is set to Yes. The email will be sent when someone attempts to access the URL AFTER the inventory has been depleted. See Creating Custom URLs for more details. |
|
||
| Prev | Next | |
| Creating Custom URLs | Error Messages |