Group Management functionality is accessible to standard and professional-level users. Group Management provides the ability to:
- Create or Modify a Group
- View Assigned and Completed Results by Group
- Search for Candidates by Group when Assigning an Assessment
- Remove Candidates from a Group
If you use Custom URLs, you can also assign all candidates who use a particular Custom URL to a Group. See Assigning Custom URL Candidates to a Group.
To create or modify a Group:
- From the Assign panel, click on Groups. You will see a page similar to the following:
.png)
If you have created any Groups previously, they will be listed here. - To create a new Group, click the Add New Group button. Double-click the name of an existing Group to modify it. For a new Group, the following page will be displayed:
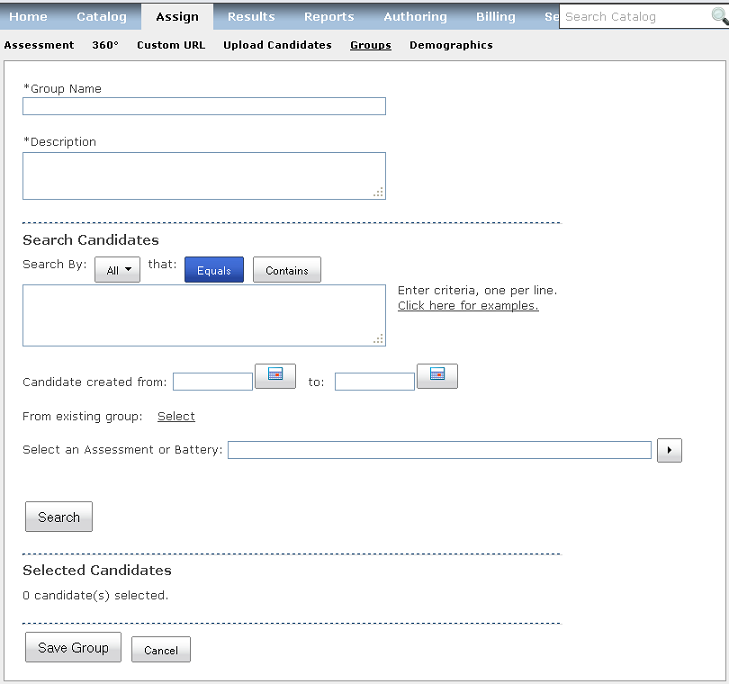
A new Group may also be added when uploading candidates from a CSV file. See Uploading Candidates for more details. - Enter a Group Name and Description. Group Name and Description may be edited for an existing Group.
- Use the Search Candidates area to find the candidates you wish to add to this Group. You can search by Last Name, Email address, Login ID, and Alternate ID. You can also search by the candidate creation date (or range of dates) or select candidates from a Group you created previously. The Select an Assessment or Battery option allows you to search based on candidates' demographic data. See the topics below for more details on each of these search methods.
Search By Candidate Fields
You can search by the following candidate record fields:
- Last Name
- Email address
- Login ID
- Alternate ID
Type the search criteria into the text box as shown in the example below:
Search By Candidate Record Creation Date
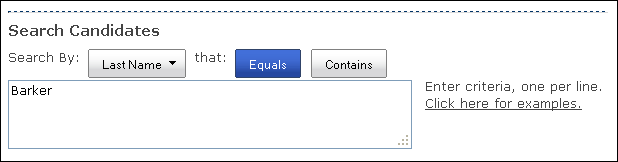
In this example, when you click the Search button, the system will find candidates with a Last Name of Barker.
To find more records, switch the “Search By” setting to All and click the Contains button (instead of Equals). See the example below:
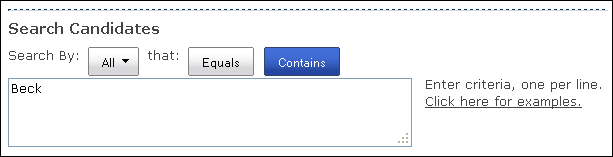
This search would find records with a Last Name of “Beck,” but also records with “beck” in the Email address, Login ID, or Alternate ID, such as:
Last Name = Beck
Email address = gbeck@mail.com
Login ID = mbeckman123
To search by the date the candidate record was created, use the date portion of the Search:
Search By Group (i.e., if the candidate is part of another Group)
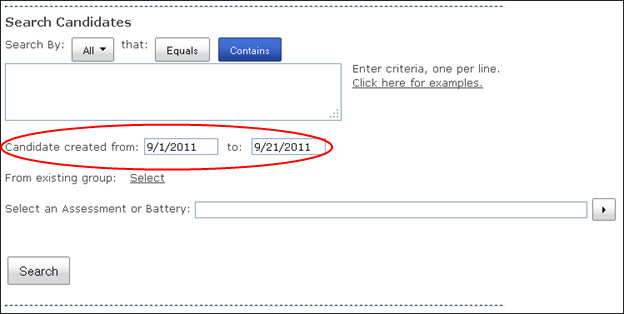
In this example, click the Search button to find records of candidates that were created between Sept. 1st and Sept. 21st.
To search for a candidate who is a member of another Group, click the Select link next to “From existing group” as shown below:
Search by Candidate Assessment Demographic Data
.png)
You will see a window similar to the following listing the available Groups:
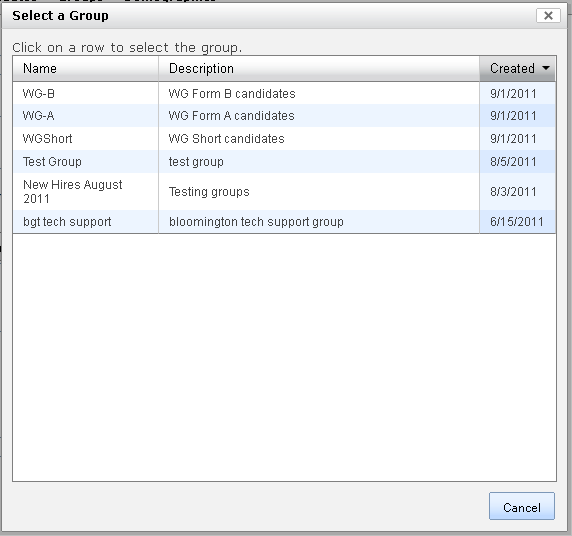
Click on the Group you’d like to select. Your selection will be displayed as shown in the example below:
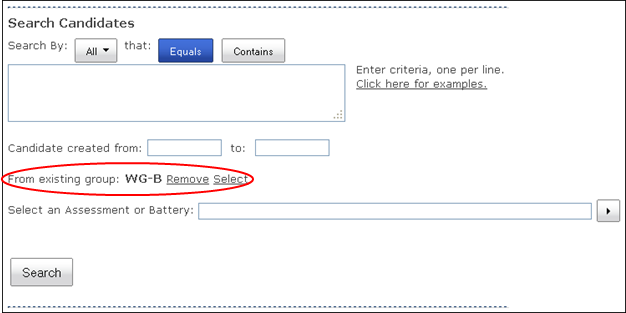
To display the list of users from the Group, click the Search button.
NOTE: Additional criteria (such as Last Name or Creation Date) could also be entered prior to clicking the Search button. The search will return records that match all the search criteria.
The Select an Assessment or Battery option allows the user to search by candidate assessment demographics data. For example, to search by demographics data for the Watson-Glaser II assessment, use the Select an Assessment or Battery drop-down list to select the Watson-Glaser II Form D assessment:
Once you have filled in the search criteria, click the Search button to locate the candidates you wish to add to this Group. The search results will appear similar to the following:
.png)
For the Watson-Glaser II, double-click "Watson-Glaser II Demographics" to search by candidate demographic data (occupation, age, title). Double-click "Watson-Glaser II Critical Thinking Appraisal - Form D Assessment" to search by Norm Group. For example, when you double-click on "Watson-Glaser II Demographics," you will see a screen similar to the following:
.png)
To search for all Females who took the Watson-Glaser II Form D, check the box next to "Sex" and Click to select answer as shown below:
.png)
Click OK to select "Female" and then click the Search button to find all females who took the Watson-Glaser II Form D.
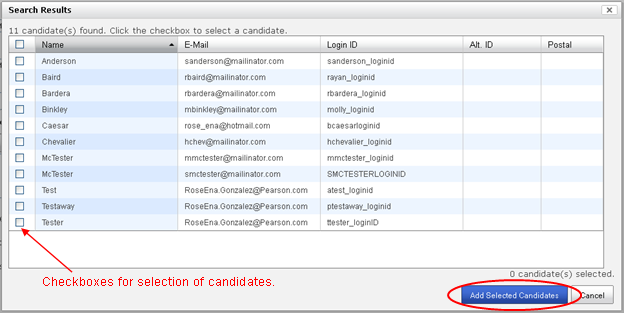
- Use the checkboxes next to each candidate name to select the candidates to add to the Group. Checking the checkbox in the column header selects all candidates in the Search Results window. Click the Add Selected Candidates button to add the selected candidates to the Group. You may perform as many search operations as necessary to find all the candidates you wish to add to the Group. The candidates you have selected will appear at the bottom of the Group edit page under "Selected Candidates" (see example below).
.png)
- Click the Save Group button to save the Group you have just created.
BE SURE TO SAVE YOUR GROUP!
The system does not prevent you from leaving the screen without saving, even if edits were made.
Viewing Assigned and Completed Results by Group
- Go to the Product Status Matrix on the Results panel:
.png)
- Select the number in the Assigned column to view assigned results:
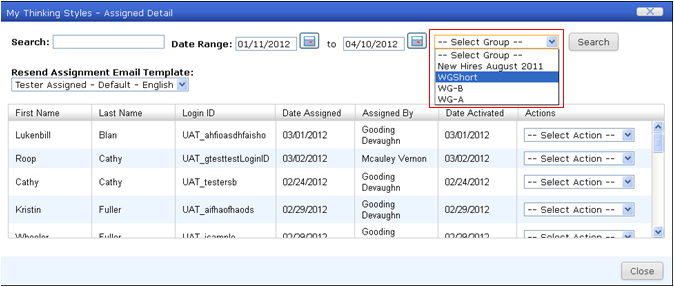
Use the Select Group drop-down list to select a Group. Click the Search button to search the assigned detail by the selected Group.Only candidates in the Assigned Detail who are members of the selected Group will be displayed.
- Select the number in the Completed column to view completed results:
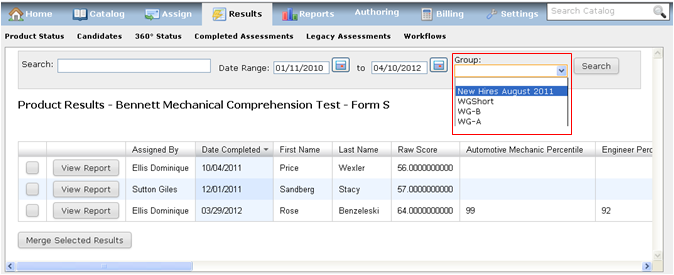
From the Group drop-down list, select a Group. Click the Search button to search the completed results by the selected Group. Only candidates in the Completed results who are members of the selected Group will be displayed.
Search for Candidates by Group when Assigning an Assessment
On the Assign panel, you can use Groups to search for the candidates you wish to assign an assessment to.
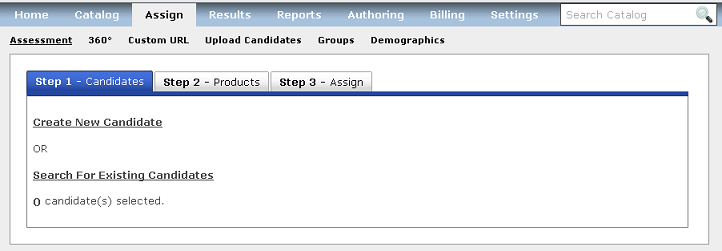
- On the Assign panel, click Search for Existing Candidates:
- From within the Search area, click on the Select link next to "From Uploaded Group" as shown below:
.png)
- A Select a Group window is displayed with a list of the available Groups. Select the Group from the Select a Group window and the Group Name will be placed into your search criteria as shown below:
.png)
- Click the Search button to search by all entered search criteria. Note that if you have entered candidate fields or creation dates, these will also be used in the search. In the above example, clicking Search without filling in any additional criteria will display a list of all candidates that are a member of the "WG-A" Group. The search results appear similar to the following:
.png)
- Use the checkboxes next to each candidate name to select that candidate for assignment or check the box in the column heading to select all candidates. Click the Add Selected Candidates button to add these candidates to the list for assignment.
- Continue with the assign process as usual.
Removing Candidates from a Group
- From within Group Management (Assign | Groups), double-click on the group to edit.
- Candidates that are members of the current Group are listed at the bottom of the Group editing page under “Selected Candidates.”
- To remove a candidate from the current Group, click the Remove button (
 ) next to the candidate(s) you wish to remove.
- Click the Save Group button to save the Group edits you have made.